Bike Tech: Smartphone cameras
Bellybuttons and opinions and…Smartphones. Everyone has one.
Welcome to our new blog series on Bike Tech, where we hope to answer some questions you didn’t know you had. If you tour by bicycle, there’s likely a smartphone along for the ride. You know the common uses: contact with friends and family; keep up with business; follow Facebook. Most guests also take a lot of tour photos, so our focus today is to help you take better pictures with the smartphone.
Let’s talk with a Pro

Jordan Buzzy is a professional photographer, and he’s been on our tour staff. We sat down for lunch recently (when restaurants could still be open) to talk about phone use and the tech problems they present. Right off the bat, we do not champion one phone system over another. They change too frequently. As Jordan says, “They’re going to keep changing. Having an operating system, Apple or Android, which works for you is ten times more efficient, vs. having a better camera. If you can’t operate it, or don’t understand it, or it’s either too simple or too smart, you’re going to struggle getting good photos.”
I want to find those things which make it easier for you to get better pics along the road, regardless if you use Apple or Android. Turn the phone camera on, and right off the bat you have decisions- landscape or portrait?
“There are a couple of rules of thumb” said Jordan. “Usually your phone will let you pick the aspect ratio. Smartphone photos are very wide, similar to a movie screen (16:10). My rule as a professional photographer is to shoot as wide and at the biggest resolution possible, and then edit later…”
To Zoom or not?
I had to interrupt right away. Did I just hear ‘let’s not zoom in, let’s not use any digital zoom until we edit?’ “Yes! You heard that in my head” said Jordan. ” When you zoom in digitally, it’s a fake zoom and you lose resolution. There’s an argument to use zoom to foreshorten the background, but this is an advanced technique. The more you zoom in, the steadier you have to be.”
How steady? And what about smashing the button to take the picture, shaking the phone? And why is there a delay sometimes, from pressing the button until the shutter goes off?
“Phones are really nice nowadays, so you don’t have to push hard to take the photo” said Jordan. “Consider setting a 2 to 10 second delay, press the button, settle yourself with a deep breath of air…and then wait for the shutter to go off. Your smartphone is automatically choosing it’s time value setting, adjusting how long it lets light into the lens. In a dark space, the phone compensates by dragging the shutter time. On Android pro settings, the time value and ISO are adjustable. If you shorten the time, the photo will be darker but crisper, and less blurry. If you know you’re in a low light or dark setting, remember the phone is going to take a second or so longer to take the photo.”
Landscapes
People take a lot of landscape photos, and Jordan has some advice to make them more interesting.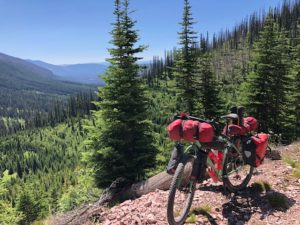
“One good trick is to put something up close in the foreground, maybe a leaf or a tree branch so close that it’s blurry. People in the photo need to stand back a bit, but not so far you can’t recognize them. For more detail, flip your phone into portrait mode and go into panorama. You’ll get more pixels in the height, and then scan as far as you need. If you’re really into it, put your phone on something that swivels and you’ll get a smoother looking panorama.”
So if your bicycle was steady and you held the phone on top of the handlebars…”Exactly!” said Jordan, ‘you could pivot your handlebars. We talk about technology, but really a lot of what helps to take a great photo is knowing how to McGuyver stuff in the field…”
Adding People to Landscapes
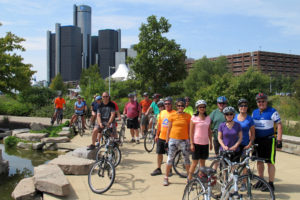 When people are part of the scene, setting up the photo is just as important. Make sure faces are close enough to be visible. Helmets and eye wear are important safety items, yet they can obscure the identity of the subject. Do: Make sure your photo guests can be seen; Find a focal point; Adjust the brightness; and suggest people remove sunglasses.
Take a look at the photo on the right. There is really nice composition here, with objects in the foreground, a great depth of field for the group of people, movement shown by the trail receding in the background, all capped with the Renaissance Center in the distance.
Auto Mode and Settings
 Jordan is a camera guy, and while he knows the technical features, many of his pictures are right off his smartphone in automatic mode. He explains: “I will do the tap to focus, tap again for the light setting photometry. Really you should be setting your exposure to the brightest thing in the scene, so it’s not blown out. I almost always bring it back one or two clicks darker because it’s easier to bring out shadows than it is to restore highlights. When a photo gets overexposed, it can’t be edited, it’s lost information. Caution- I find that cameras now, especially in HDR settings, want everything overexposed. Learn to play with the exposure slider and find what best fits your scene, not the one which is most technically exposed.”
Try an experiment with your camera phone at home. Find a scene with some depth, and tap the screen on an object in the foreground; objects in the back may become blurry. Alternatively, tap on an object in the background and watch the foreground lose focus. Notice at the same time there is an exposure slider on the screen; drag down to darken the photo, and up to let in more light. In the desk top photo, look for the scissors handle and notice the yellow box; one tap brings up this box and the camera focuses here. The sun symbol is a slider to let you adjust the light level.
Photo sharing
Once you’ve edited your photos, how do you share them with friends? Facebook and texting might be good for a few photos, but there’s probably a better way. I recently attended a Microsoft class on photo sharing, at a location with poor internet service. I followed the recommended steps and when I got online again, the instructions worked perfectly. You can see details here. If you have a favorite photo-sharing service, please let me know!
Easy Online Links
For Android tips, check out this link , and Apple users please look here. There are about a million other online choices, so explore a bit.
Final thoughts
I asked Jordan if he had anything else to say. “Be mindful of the light, and of your settings,” he replied. “Be sure you’re stable. Use the best piece of technology you have to capture the image. Don’t fight technology, just be aware of it. If you pay attention to the light, where you’re standing- don’t just pull out the phone and take the first shot- take a step to the left or to the right, be sure you’re ready, and you’ll get better images.”
Thanks for reading. I’d love your photo feedback. Send questions or comments to jim@biketourvacations, or to jordanbuzzy@gmail.com. For a list of great places to go take pictures, please visit Bike Tour Vacations. Thanks!
PS: Here are 3 of my favorite tour photos-
The post Bike Tech: Smartphone cameras appeared first on Bike Tour Vacations.


